[Airflow] Airflow 내맘대로 꾸미기 (Elasticsearch, plugin)
Plugins
기본적으로 소프트웨어 기능을 호가장하는 모듈을 plugin이라고 부름.
기본으로 제공되지 않는 기능을 추가하기 위해 사용.
Airflow는 확장성을 위해 plugin 시스템을 제공함. python 코드로 작성 가능.
Airflow에서는, Views, Operators, Hooks, Sensors 포함 모든 컴포넌 customize 가능하다.
customizing을 위해서는, 우선 class를 만들어야 함. AirflowPlugin class.
한번 만들면, 마치 시중에 유통되는 python module처럼 쓸 수 있음.
염두할 것은, custom plugin은 lazy loaded 되기 때문에, 만들고 나면 restart 해줘야 반영됨.
우리는 Elasticsearch를 활용할 수 있는 airflow plugin을 만들어보자. 그 전에 뭔지부터 배우고 일단.
Elasticsearch란?
NoSQL 중에서도 문서 기반 NoSQL DB 에 속함. 그래서 JSON 형식 문서를 저장함.
Elasticsearch의 강점은 검색 시 매우 빠르게 찾을 수 있다는 것. 대량의 데이터를 실시간으로 검색, 저장, 분석하는 데 최적화되어 검색 속도가 매우 빠르고, 대용량 데이터를 처리하는 데에 강점이 있음.
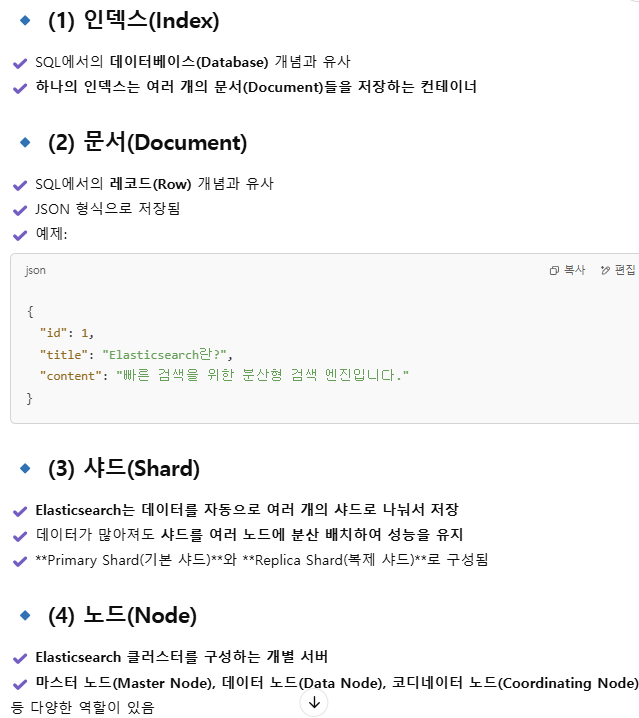
1 고속 검색 Full-Text Search: SQL보다 빠른 검색 속도 제공. JSON 형태의 문서 저장 및 검색.
2 분산 시스템 Scalability: 여러개의 node로 이뤄진 cluster 형태로 동작. 샤딩 활용함.
3 RESTful API 지원
4 실시간 데이터 처리: ELK (Ela + Logstach + Kibana) / EFK (Ela + Fluentd + Kibana) 로 사용됨.
=> 로그 데이터 분석, 검색 서비스, 추천 시스템, 보안 및 이상 탐지 등에 쓰임.
❓그냥 궁금해서 그런데, 저리 좋으면 왜 데이터 엔지니어링에서는 잘 안 쓸까?
❗데이터 엔지니어링에서는 저장+처리가 중요한데, E는 검색 특화 DB이기 때문.
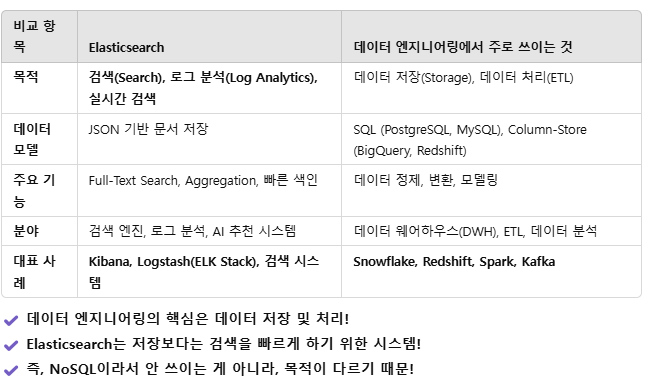
정리하면, Elasticsearch의 강점은 검색인데, DE에서는 저장 혹은 처리에 강점이 있는 게 중요하기 때문에 안 맞음.
ES는 검색 엔진, ELK 스택 (로그 데이터 분석), 실시간 데이터 모니터링 등 가공보다는 검색, 분석에 주로 쓰임.
Use Elasticsearch with Airflow
현 상황: Airflow에는 기본적으로 MySQL, PostgreSQL 같은 DB 훅은 있찌만 ES Hook은 없음.
그래서: Elasticsearch와 연결하려면 직접 hook을 만들어야 함. 그 작업을, plugin을 개발하는 방식으로 구현해주려고 함.
※ elasticsearch operator는 있음. 그러나 이걸 쓰게 되면, elasticsearch를 쓰는 모든 DAG에서 직접 elasticsearch 객체를 직접 생성해야 하고, 연결 설정을 바꾸려며 모든 DAG 파일을 수정해야 함. 그래서 몸통 역할을 만들어 주는 것임.
예를 들어 elastic operator를 쓰게 되면, 아래처럼 주소를 넣어줘야 함. 또한, airflow connection을 활용할 수 없다고 함(이 부분은 잘 이해가 안되지만, 일단 넘어감).
from airflow.models import DAG
from airflow.operators.python import PythonOperator
from elasticsearch import Elasticsearch

def insert_data():
    es = Elasticsearch(["http://localhost:9200"])
    doc = {"title": "테스트 문서", "content": "Elasticsearch에 저장됨"}
    es.index(index="my_index", doc_type="_doc", body=doc)

with DAG("no_hook_dag", start_date=days_ago(1), schedule_interval="@daily") as dag:
    task = PythonOperator(task_id="insert_data", python_callable=insert_data)
docker-compose 파일에 elastic을 넣어줌 - 파일 이름은 docker-compose-es.yaml
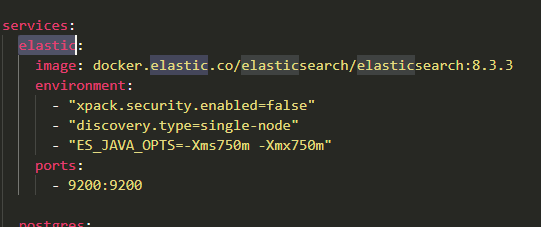
※ 참고로, 저렇게 두개 이상의 docker-compose 파일이 있고 둘 중 저 파일로 docker-compose 해주고 싶은 거면
docker-compose docker-compose-es.yaml up -d
이렇게 실행해주면 됨.
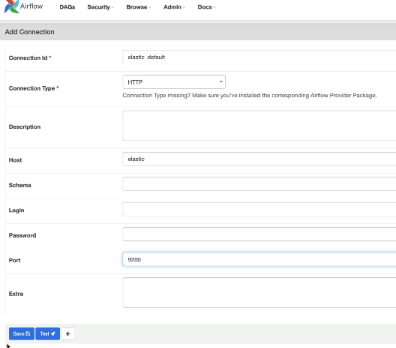
그리고 추가로 connection도 만들어 줘야 함. 이렇게 http 기반으로, Host elastic으로, port 9200으로 설정하면 끝.
그리고 plugins/hooks 하는 관계의 파일들을 새로 만들어주고, 그 안에 elastic 파일 만들고, elastic_hook.py 작성.
from airflow.plugins_manager import AirflowPlugin
# plugin 만들거면 이거 필수고
from airflow.hooks.base import BaseHook
# hook을 커스터마이징할 거면 hook 불러오고

from elasticsearch import Elasticsearch
# elasticsearch에 대한 거니까 elasticsearch 불러오고

class ElasticHook(BaseHook):

    def __init__(self, conn_id='elastic_default', *args, **kwargs):
        super().__init__(*args, **kwargs)
        conn = self.get_connection(conn_id)
        # connection 활성화해주고

        conn_config = {}
        hosts = []

        # 받아온 config 및 hosts 정보 로컬에 담기
        if conn.host: hosts = conn.host.split('.')
        if conn.port: conn_config['port'] = int(conn.port)
        if conn.login: conn_config['http_auth'] = (conn.login, conn.password)

        self.es = Elasticsearch(hosts, **conn_config)
        self.index = conn.schema

    def info(self): return self.es.info

    def set_index(self,index): self.index = index

    def add_doc(self, index, doc_type, doc):
        self.set_index(index)
        return self.es.index(index=index, doc_type=doc_type, doc=doc)


# 플러그인을 위해서는 이 부분이 필수임. 이걸 적용하려면 docker-compose 다시 up.
class AirflowElasticPlugin(AirflowPlugin):
    name = 'elastic'
    hooks = [ElasticHook]
plugin이 잘 적용되었는지를 확인하기 위해서는, airflow scheduler에 들어가서 plugin 확인해줘야 함.
docker exec -it materials_airflow-scheduler_1 /bin/bash
airflow plugins
거기에 "elastic" 이 뜨면 대성공.
이제 훅을 만들기는 다 끝났고, 이걸 활용하는 python operator를 가진 dag 만들어보자.
from airflow import DAG
from airflow.operators.python import PythonOperator
from hooks.elastic.elastic_hook import ElasticHook

from datetime import datetime

def _print_es_info():
    hook = ElasticHook()
    print(hook.info())
    # 이 프린트는 해당 task의 log에서 확인 가능함.

with DAG('elastic_dag', start_date=datetime(2022, 1, 1), schedule_interval='@daily', catchup=False) as dag:

    print_es_info = PythonOperator(
        task_id='print_es_info',
        python_callable=_print_es_info
    )
Done.